Taxes
You can define as many different taxes as needed in Duet. Tax examples might include a 10% State Sales tax, an 12% State Liquor Tax, a .05% County Tax, etc. In Duet, these are referred to as Tax Types. You can create tax types that are inclusive (VAT) or taxed on top of menu items. Once you have created your taxes types, you will add them to a tax table. The same tax can be applied to multiple Tax Tables. Similar to individual taxes, you can create as many tax tables as needed. Multiple taxes in a Tax Table may be applied to any given transaction based on revenue centers, menu groups type, menu group, or at the menu item level. You cannot, however, apply taxes from different Tax Tables to a single transaction. Both Tax Type and Table Tax setup forms are found in the Duet Management Console under General Settings.
Note: Duet defines the VAT (Value Added Tax) as a tax that is included in the sale price of a particular item. For instance if you define a beer with a price of $5.00 and link that beer to a 10% VAT tax, Duet will bill the customer $5.00 and record the transaction as a $4.55 sale and a 45 cent tax. If the beer is priced at $5.00 and taxed with a standard 10% sales tax, Duet will bill the customer $5.50 and record a sale of $5.00 and a tax of fifty cents.
Creating Tax Types
A tax type is an individual sales tax collected on behalf and paid to a governing body for the sales of certain goods and services. In the hospitality business, this is typically a tax applied to menu items and some services. You can define as many Tax Types as needed using the following steps:
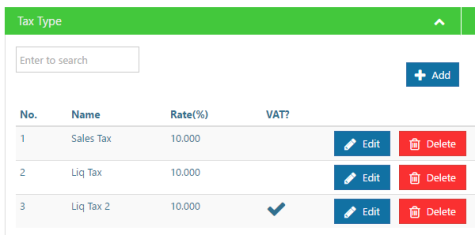
- Click Tax Type on the under General Settings
- Click Add button
- Type tax name in Name field. Example - State Tax, Liquor Tax, Sales Tax, etc
- Type in the tax rate to be charged. This must be a number value. Example: 9, 9.75, 10.5, etc
- Use toggle button to define if tax is to be a VAT tax (inclusive of price). Yes indicates the tax will be VAT
- Click Save.
The steps above need to be repeated for additional taxes
Creating Tax Tables
Tax Tables are a collection of tax types that can contain one or several different taxes. You can create as many tax tables as needed. it in the Bar Tax Table. Tax Tables are applied in Revenue Centers and in Menu Tree Setup Form at the Menu Group Type (Parent Group Type), Menu Group, and Menu Item levels. Using our example, to finish the process, you will assign the DR Tax Table to the Dining Room Revenue Center and the Bar Tax Table to the Bar Revenue Center.
Use the following steps to create a Tax Table:
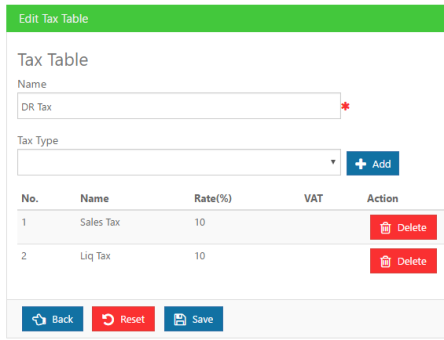
- Click Tax Table on the under General Settings
- Click Add button
- Type tax table name in Name field. Example - a tax table named "DR Tax" may contain both a liquor and a sales tax
- Click the Down icon in the Tax Type field and choose a tax type. Example - State Tax, Liquor Tax, Sales Tax, etc
- Click the Add button to add the tax type to the table.
- Repeat steps 4 & 5 to add tax types.
- Click Save when you are finished adding tax type.
An alternative method to creating a tax table is to copy an existing tax table and then use the "Edit" function to rename, add or delete existing tax types.
TAX TABLE EXAMPLE: Examples of tax tables are a DR Tax Table and Bar Tax Table. The DR Tax Table might contain tax types for sales tax and a liquor tax that are applied at different rates. Both taxes will be applied on top of the sales. However, in the bar, you might want to have the liquor tax to be inclusive of the sale. In this scenario, you will create a liquor "VAT" tax and place it in the Bar Tax table. Using our example, to finish the process, you will assign the DR Tax Table to the Dining Room Revenue Center and the Bar Tax Table to the Bar Revenue Center.
Applying Tax Tables to Revenue Centers
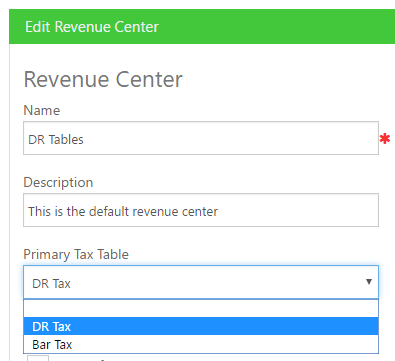
The logic for taxing transactions works as follows: Every Duet POS device on the system links sales transactions to a default Revenue CenterA Revenue Center serves many purposes including assigning sales to different areas of the restuarant for reporting purposes, controls prompts, how items are to be intially taxed, along with gratuity and service charge assignments. . Each Revenue Center, in turn, links to a default "Primary" Tax Table. You must add a Primary Tax table to each revenue center in the system to insure items are being taxed properly.
Add a tax table to a revenue center using the following steps:
- Click General Settings
- Click Revenue Center
- Use the down arrow on the Primary Tax Table field to select a tax table on the drop down list.
Repeat these steps for each revenue center
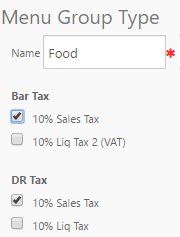
Applying Tax Tables to Menu Group Types
Revenue Centers define where taxes are applied. Menu Groups types will determine what a tax is applied to. Menu Group Types serve as a link to tax rates to Menu Groups and Menu Items. All Menu Groups and Menu Items belonging to a Group Types will assume the tax tables applied to a group type but can be changed at the Menu Group and Menu Item levels. All available tax tables will appear on the Menu Group Type Setup Form. Just click a tax type within a tax table to apply a tax to a Menu Group Type and click the Save button to retain your changes.
Applying Tax Tables to Menu Groups
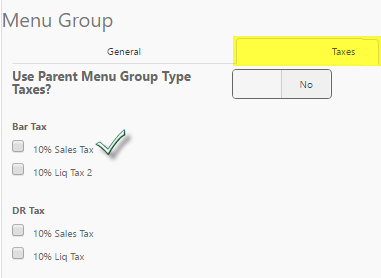
By default all Menu Groups will be taxed at the Menu Group Type that they belong to. However, you can apply different tax tables at the Menu Group level if needed. This may be necessary if items within a particular menu group are taxed at a different level than other menu groups assigned to the same Group Type. An example might be where seafood may have a restocking tax. In this case you can assign a different tax with the benefit of having those group types and menu items report to the same group type. The Menu Group Tax setting is found under the "Taxes" tab under the Menu Group Setup Form (Menu Group Type > Menu Group). Click the "Yes" toggle button to reveal the Tax Tables and then check the appropriate tax types. Click "Save" to retain your changes.
Apply Tax to Menu Item
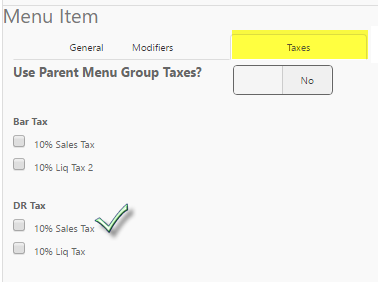
Similar to Menu Groups, you can apply a tax to a menu item. By default, taxes will be applied to all menu items belonging to the menu group it is assigned to. However, you can apply a separate tax group to an individual menu item if needed. Taxes applied at the menu item level will over ride the group settings. This is ideal for menu items that may carry an extra tax (i.e. sugar tax on soft drinks) but you still want them to report to the same menu group. The menu item tax setting is found under the "Taxes" tab under the Menu Item Setup Form (Menu Group Type > Menu Group > Menu Item). Click the "Yes" toggle button to reveal the Tax Tables and then check the appropriate tax types. Click "Save" to retain your changes.